


Welcome to Part 2 of our adventure. If you have read Part 1, you will have your tools assembled and ready to go. If you haven’t read it, please go ahead and do that before reading the rest of this post. There are several tools that you will need in order to make your sloper.
Ok? Ready? Yeah! Let’s get to making that sloper!
Taking Measurements
As mentioned in Part 1, you will need the Foundations of Drafting with Instructions document in order to create you sloper. The sloper is required to make the garments in the Haslam catalogues. Trust me, once you have your sloper made, you will be off to the races! The catalogue/magazine for Haslam are chock full of amazing garments to make!
The first thing you will need to do, before creating a sloper is take your measurements. There are clear and concise instructions on what measurements you will need and how to take and calculate them. It is very important that you take all of the measurements.
The beauty of a pdf is if your measurements change over time or you want to create a sloper for someone else, all you need to do is print off the measurement page again.
Once you have completed calculating your measurements, you are ready to make your sloper.
{you will need someone to help you take the shoulder measurements}

Making Your Sloper
For this post, I am going to show you how to create a sloper bodice back piece only. In Part 2a, I will show you how to make the sloper bodice front piece. I thought that it would be less overwhelming to break the creation of the sloper into two pieces. There are quite a few steps and I know for myself personally, when I am learning something, if I digest it in small pieces, I am less likely to get frustrated.
*The reason I’m creating a bodice sloper rather than a full dress sloper, is I tend to make a lot of gathered skirt dresses. Personally, I find it easier to work with just a bodice piece in those circumstance. That said, I will be creating a full dress sloper in a future YouTube video! (you can subscribe here for future content) If you want to continue on and complete the full dress sloper, go for it!*
Tip 1: You will need to punch holes on the ruler/template for your measurements.
Tip 2: I strongly suggest using a sharp/pointed pencil and a softer lead for drawing your lines.
Tip 3: Use poster board/bristol board to create your sloper. It is a sturdier material and you will be able to use it over and over again. I also pasted my ruler/template to poster board/bristol board.
Tip 4: For the creation of the initial dots, you don’t want your ruler to move. You may want to put pattern weights on it.
If you have any questions about the instructions or suggestions, please leave them in the comments below.
The Steps:
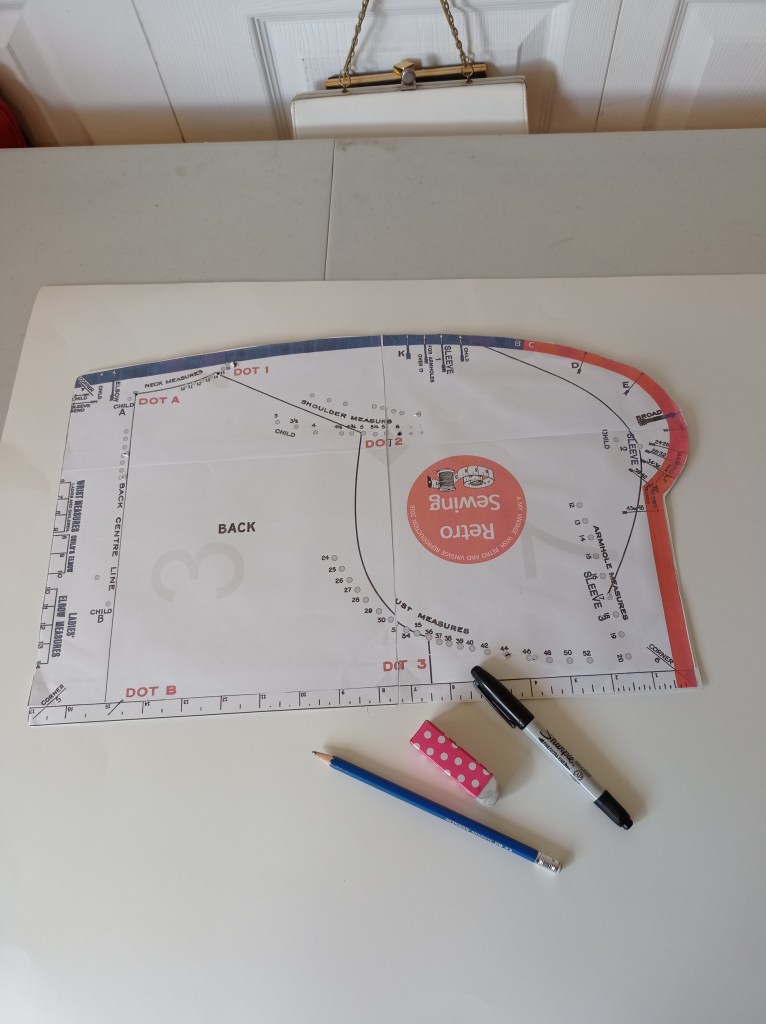
Back of Foundation (dress bodice)
Place the Chart on the paper with the long straight edge toward you, and the left-hand edge on the edge of the paper.
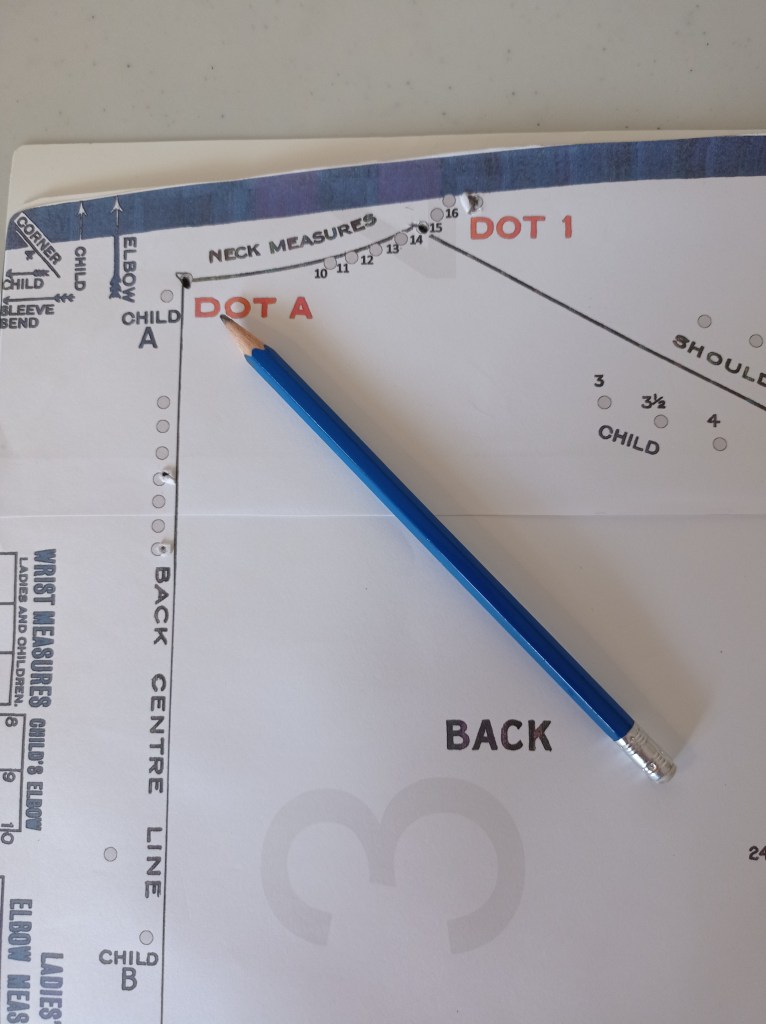
For these dots, you won’t be moving the template around, please try your best to keep it in the same spot. In the images, I have the pencil pointing at the dot you should be making.
Now make the following dots (steps below in photos):
Dot A
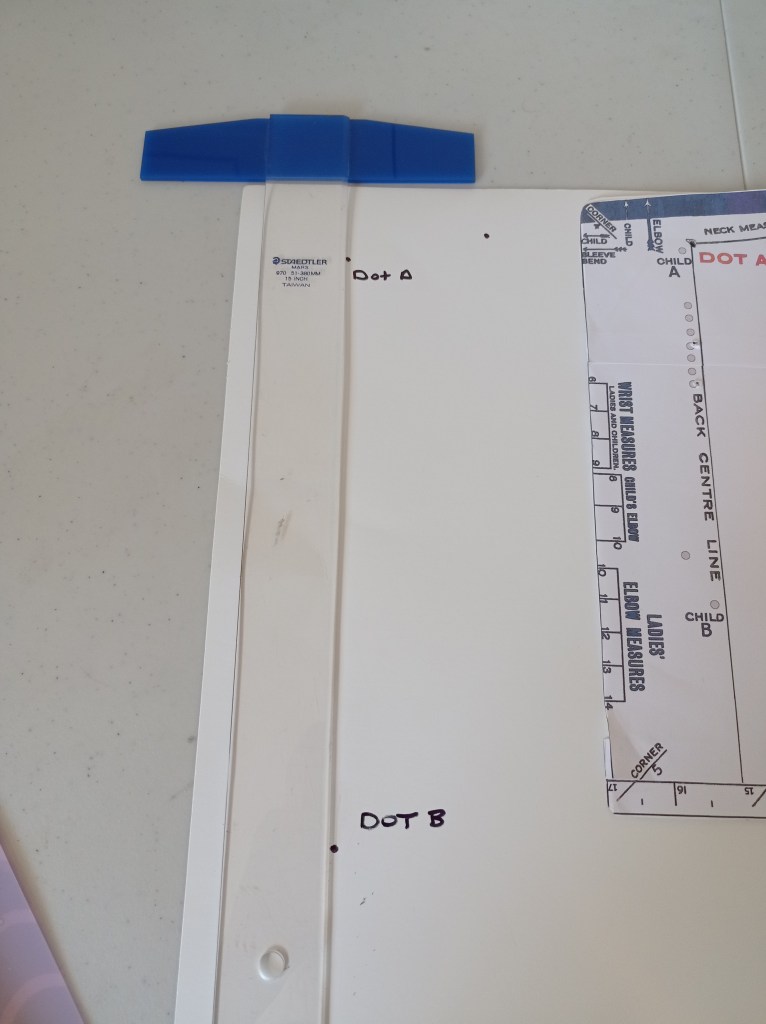
Dot B
Dot 1 (neck measurement)
Dot 2 (shoulder measurement)
Dot 3 (bust measurement)
Make sure to note, which dot is which. Knowing where they are, will be important and help you out when you make the pattern pieces! Once you have created the above dots, you will now be moving the template around to make the rest of the lines and curves.
Dot A
Dot B

Neck measurement (Dot 1)

Shoulder measurement (Dot 2)

Bust Measurement (Dot 3)

Now that you have made your initial dots, you are going to start drawing some lines and curves using your template.
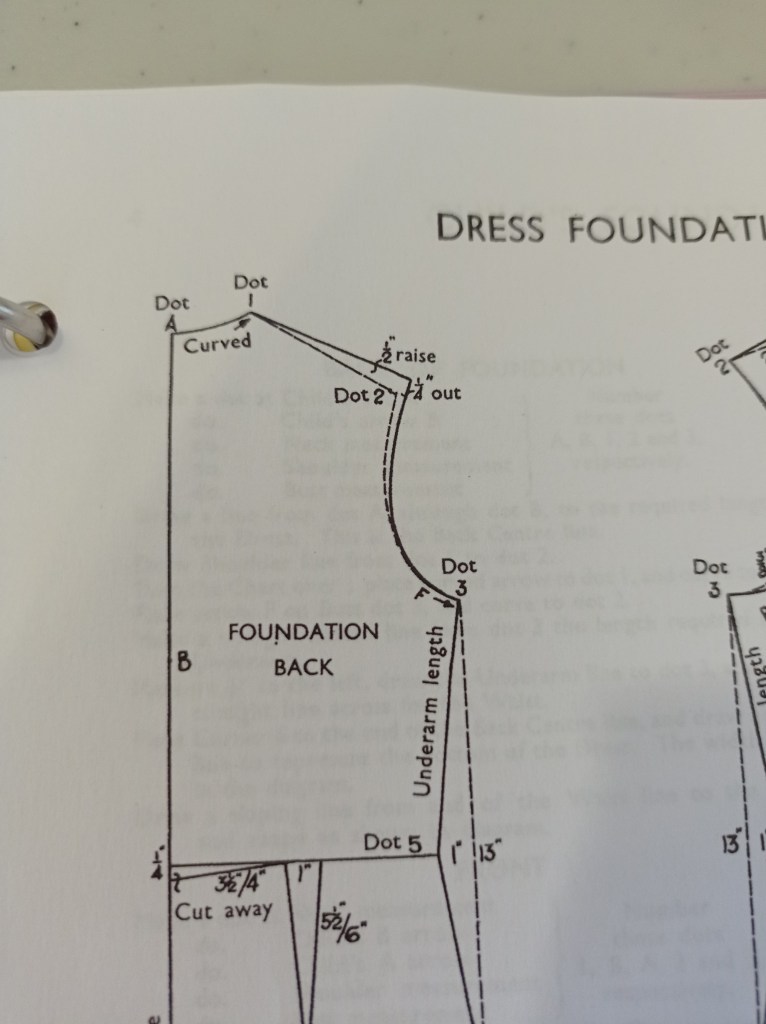
Draw a straight line from Dot A to Dot B (this is your Back Centre Line)
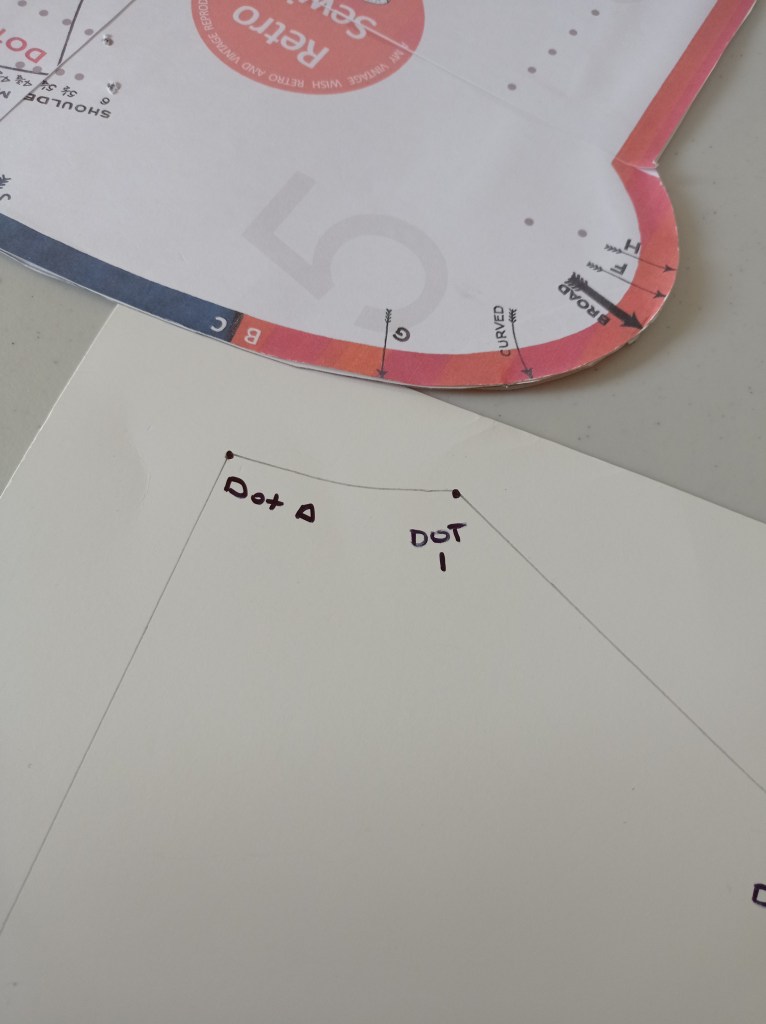
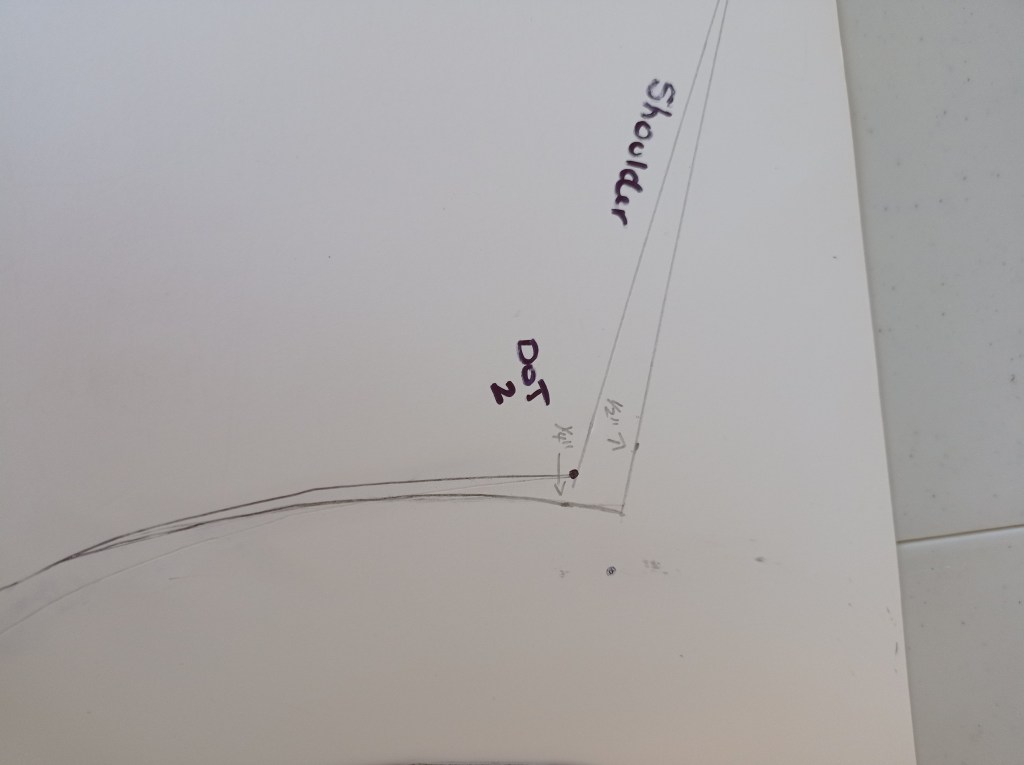
Draw the Shoulder line from Dot 1 to Dot 2.

Draw the neck curve. To do this turn the chart over to the front side and place the Curved arrow on Dot 1 and draw to Dot A.

Draw the armhole curve. Place arrow F on the Dot 3 (Bust), with the blue curve of the Chart on your left and draw to Dot 2. (If your bust is 40″+ use Arrow H on Dot 3 and draw to Dot 2)

Place arrow F on the Dot 3 (Bust), with the blue curve of the Chart on your left and draw to Dot 2 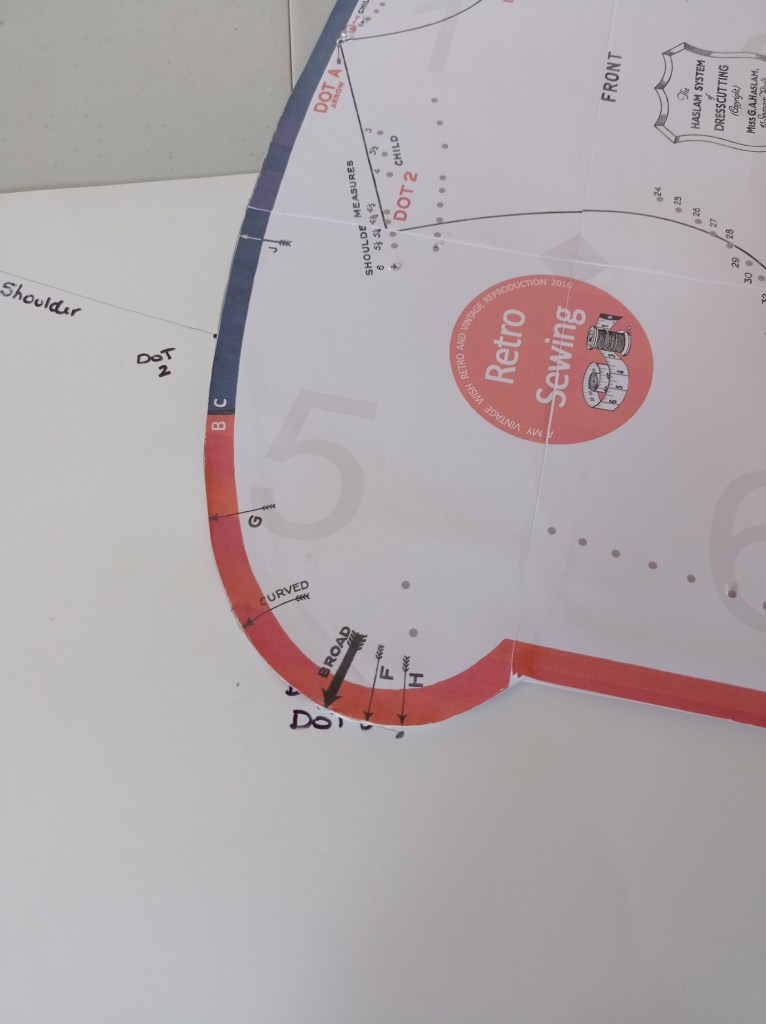
(If your bust is 40″+ use Arrow H on Dot 3 and draw to Dot 2) 
Mark the 1/2″ Shoulder raise and 1/4″ extension at Dot 2 and draw the lines as show in the diagram (Foundation Draftings with Instructions).
At this point (since we now have an armhole), I measure from the bottom of the armhole to my natural waist. (in my case 7″). I then draw a dotted line down. Using this, I continue the line for the Back Centre Line (vertically) to match. I then draw a line horizontally to connect them. If you are doing a full dress sloper, you don’t do this.
Draw the underarm. Draw a dotted line from Dot 3 to Dot 4. Then mark the length. Now measure 1″ inwards and make Dot 5. Draw a straight line from Dot 3 to Dot 5.

I measure from the bottom of the armhole to my natural waist. (in my case 7″). I then draw a dotted line down.
Then draw a line from Dot 5 to the Centre Back line. (This is where your natural waist will be.)
You have now drawn your back bodice sloper! As mentioned above, I will show you in Part 2a, how to make the front sloper.
Please let me know if this was helpful, or if you have questions!

1 thought on “Haslam System of Dresscutting: Part 2a – Drafting Your Sloper”