Hello and welcome to Killer Kitsch Lizzie! My little world where I sew, knit, and go on vintage reproduction journeys!
Today we are going to build a template! Do you have your tools ready!!!
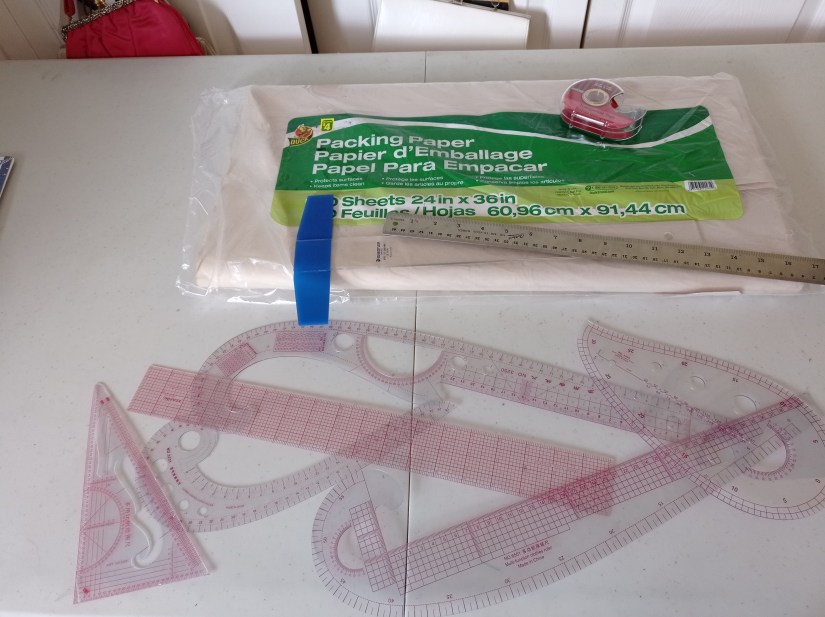
As I mentioned in the previous video, you will need a few items.
*The .pdfs
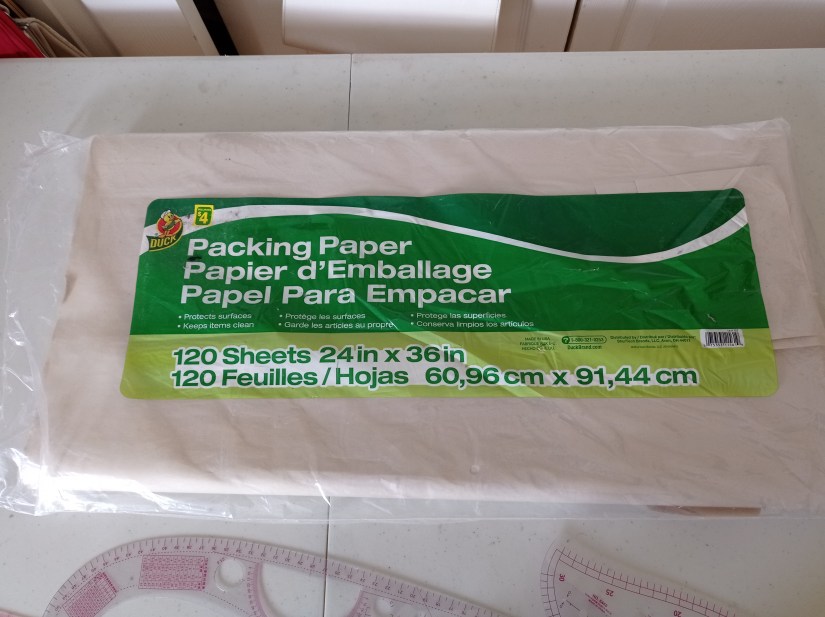
*Some kind of tracing paper or large sheets of something. I personally use brown packing paper to draw my patterns on.
*Poster board or as we call it in Canada bristol board. I glue my template to it, to give it more structure. You will also use the poster board to make your pattern block.
*Pencils, pencil sharpener, eraser, and markers.
*Paper scissors
*Glue of some sort. Elmer’s glue works, but I personally preferred using a glue stick. It was easier for me.
*I also found an awl as a handy tool for punching the holes.
Now. Let’s put together the template!!!
Thank you for watching! Please subscribe and tell your friends!
If you are inclined, I have a Ko-Fi account. All donations are appreciated and will help me upgrade my equipment (lighting, microphones etc). Thank you so much!
Welcome to Part 2b of our adventure. In this part we will draft the sloper front piece. Now that you have had practice with just the bodice sloper for the back piece, this will be a lot easier to understand!
Ok? Ready? Yeah! Let’s get to making that dress sloper!
The Steps:
Front of Foundation
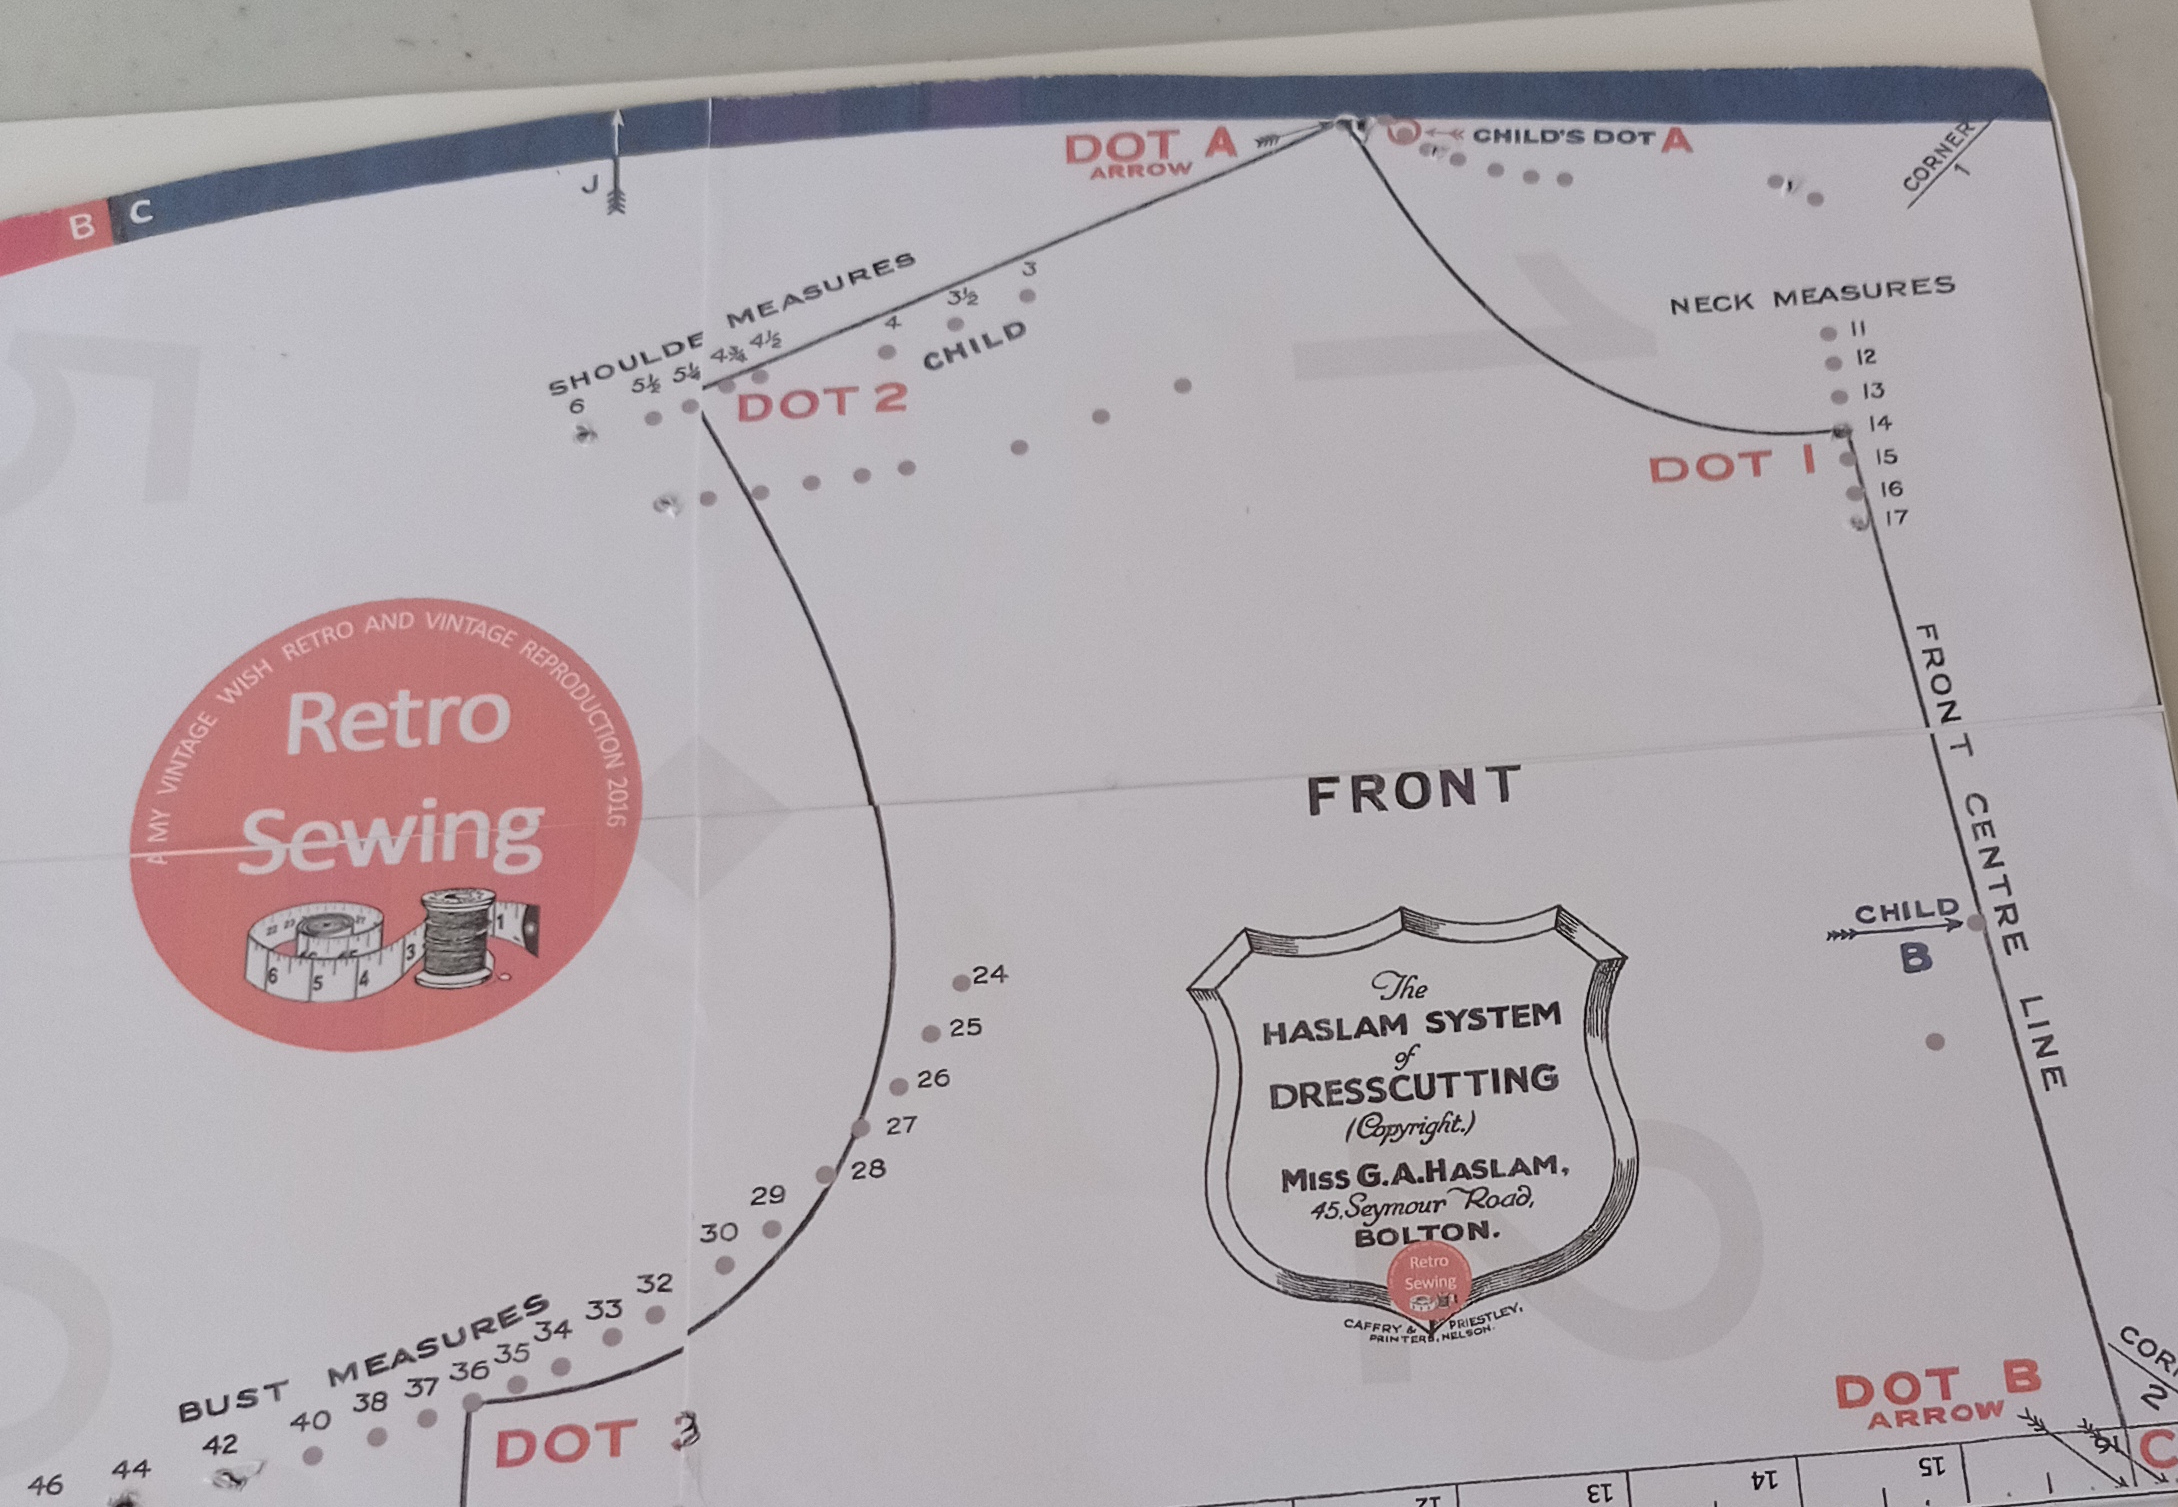
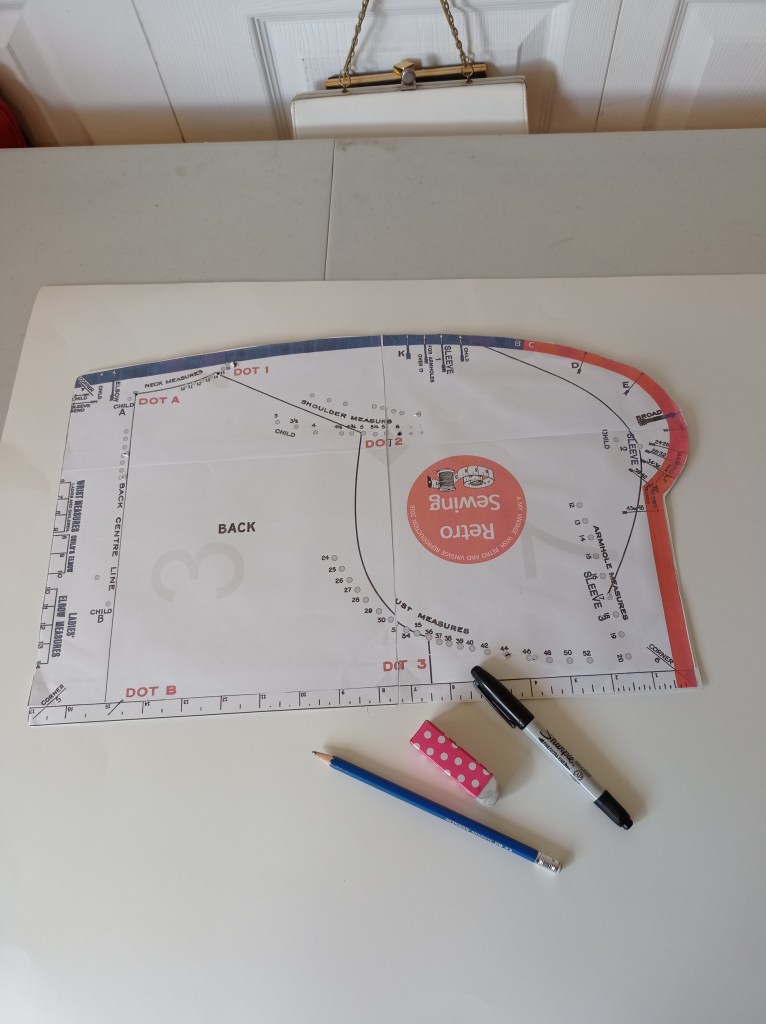
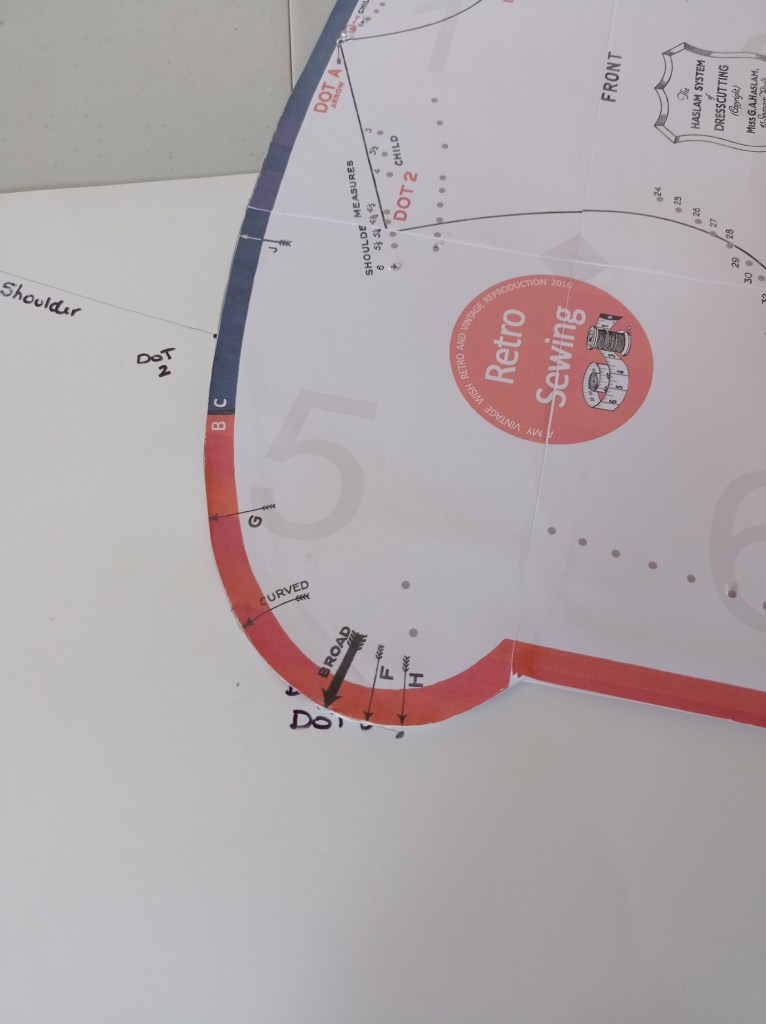
Place the Chart on the paper with the long straight edge toward you, and the right-hand edge on the edge of the paper.
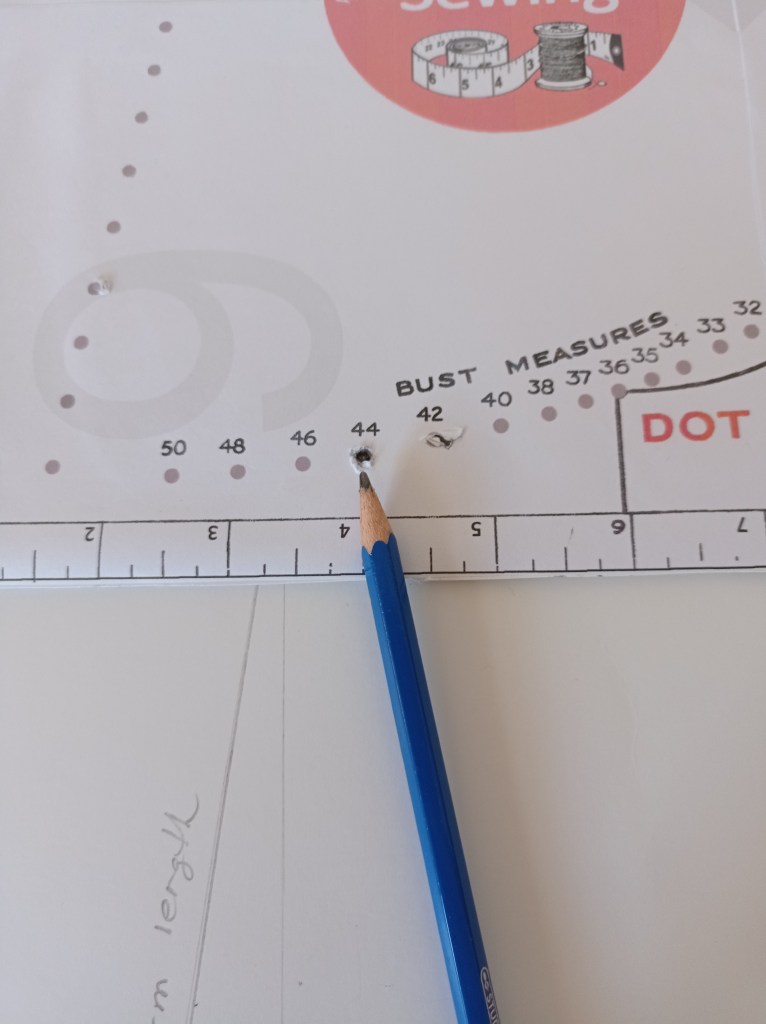
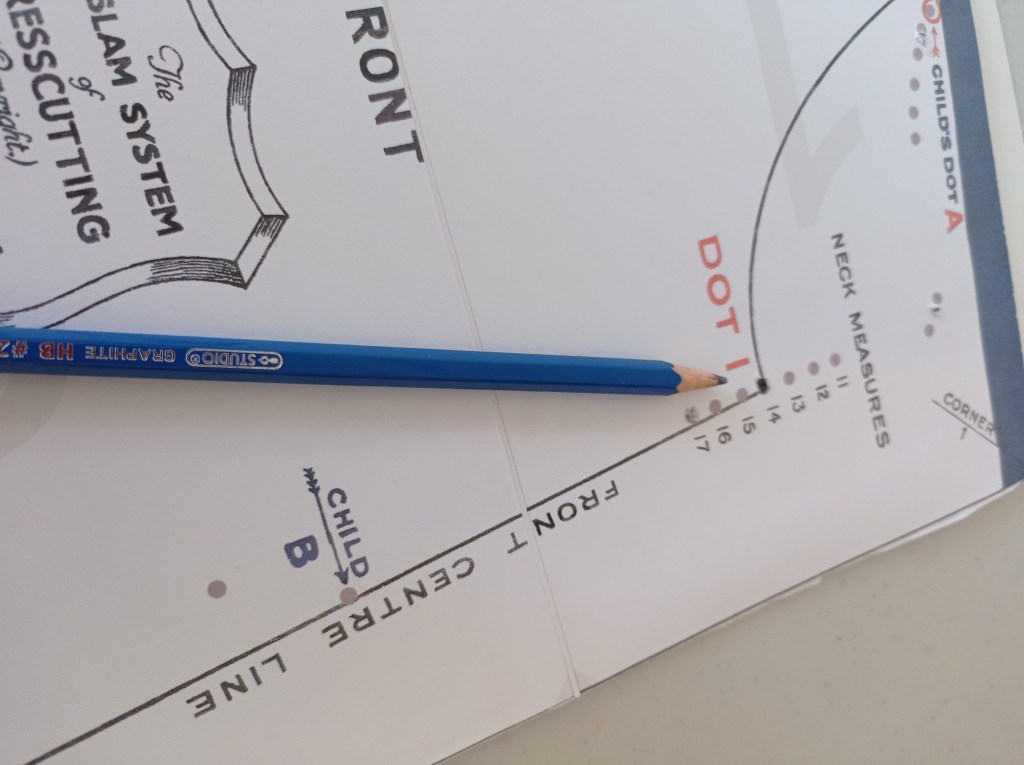
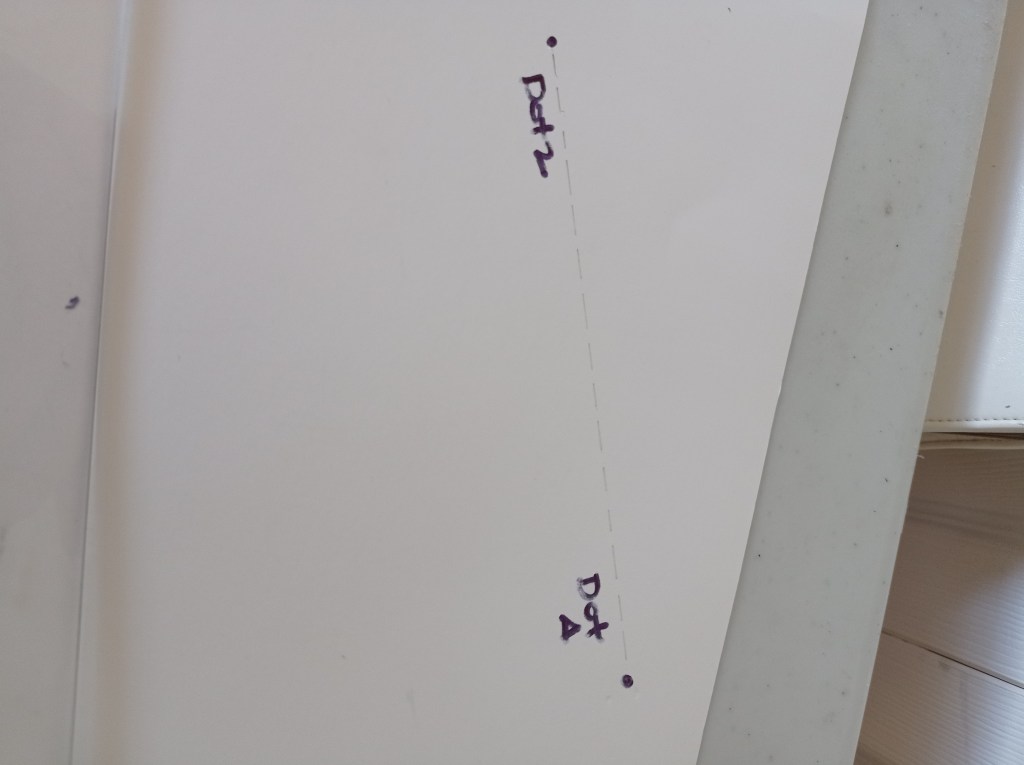
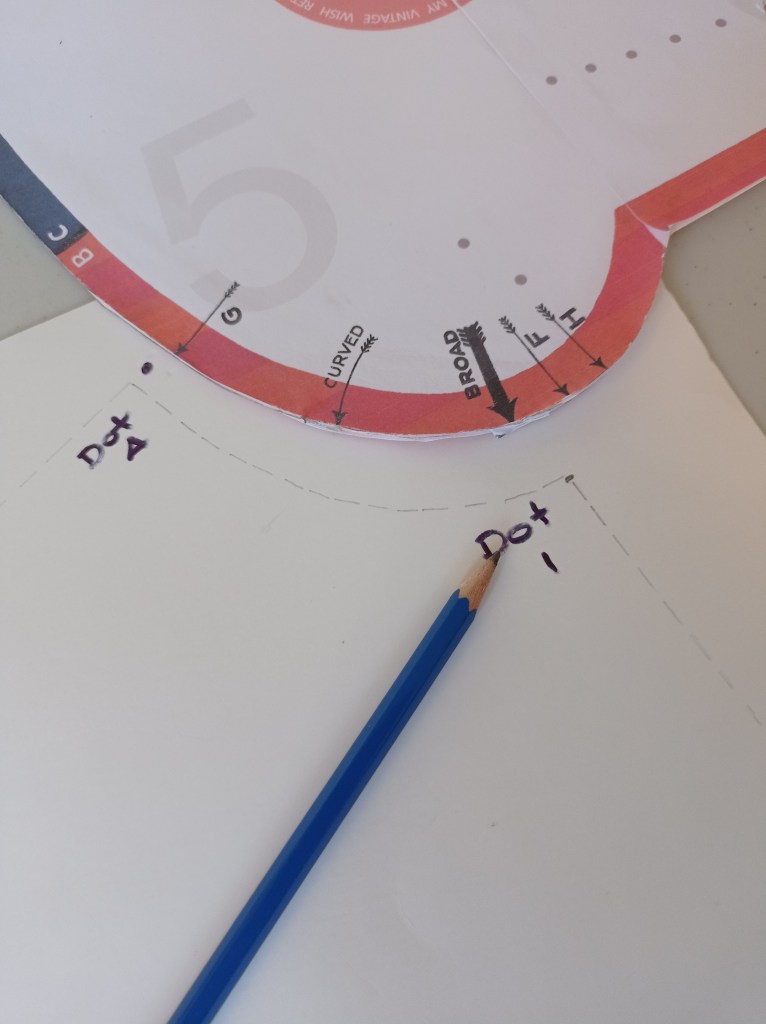
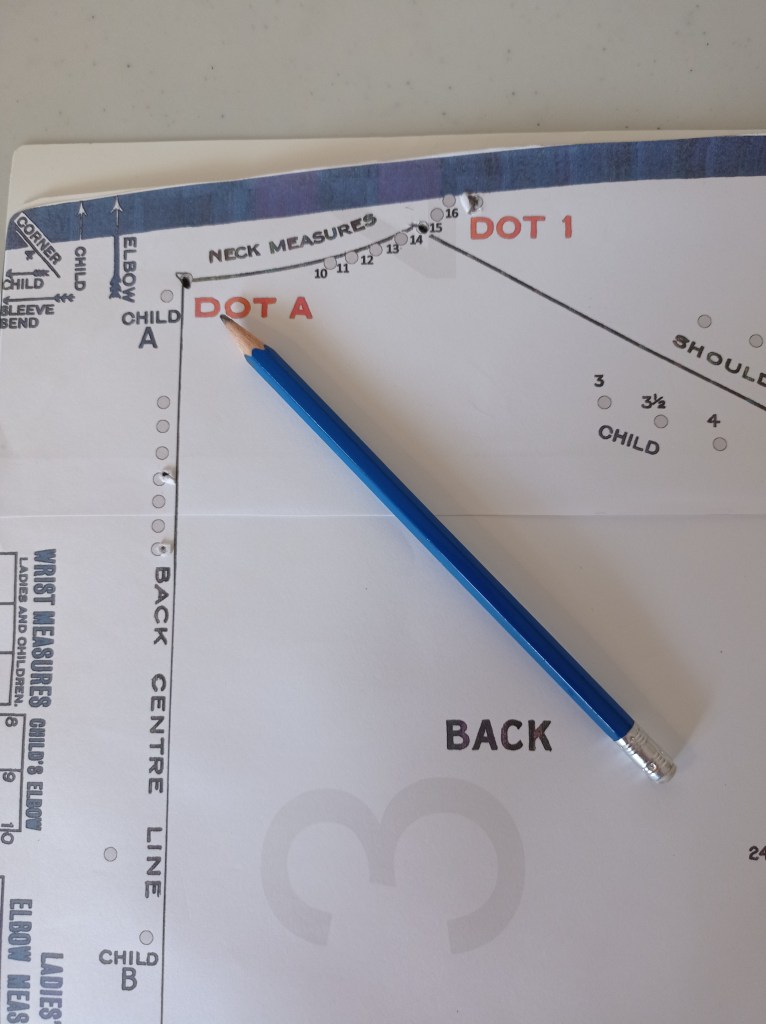
For these dots, you won’t be moving the template around, please try your best to keep it in the same spot. In the images, I have the pencil pointing at the dot you should be making.
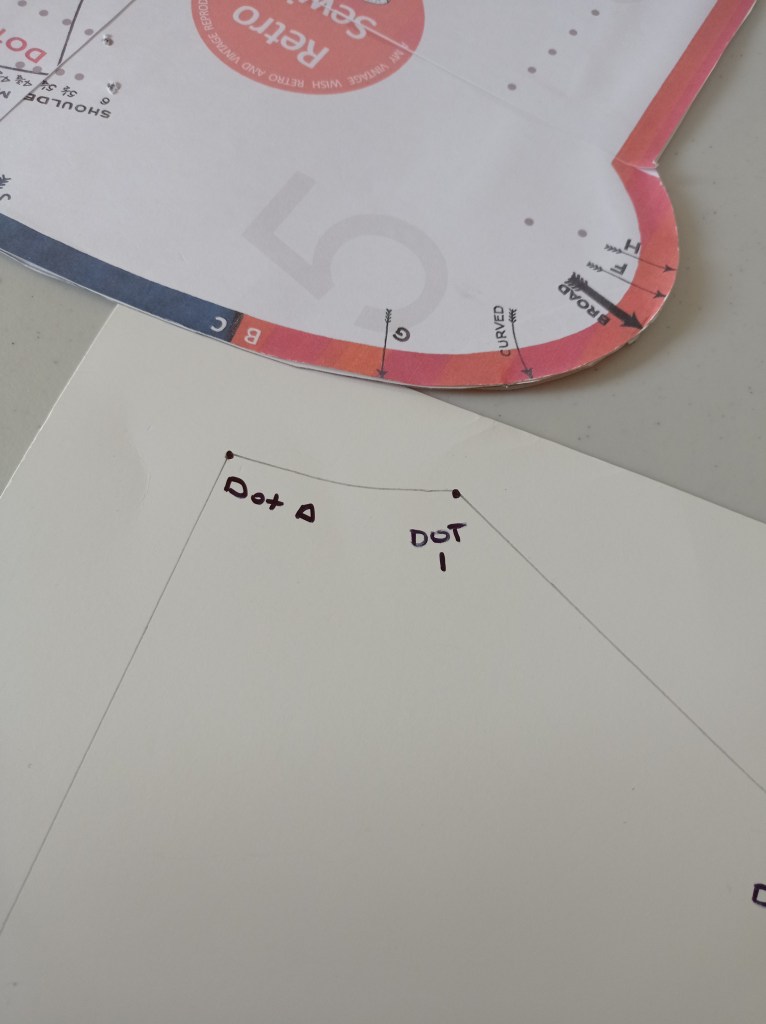
Now make the following dots (steps below in photos):
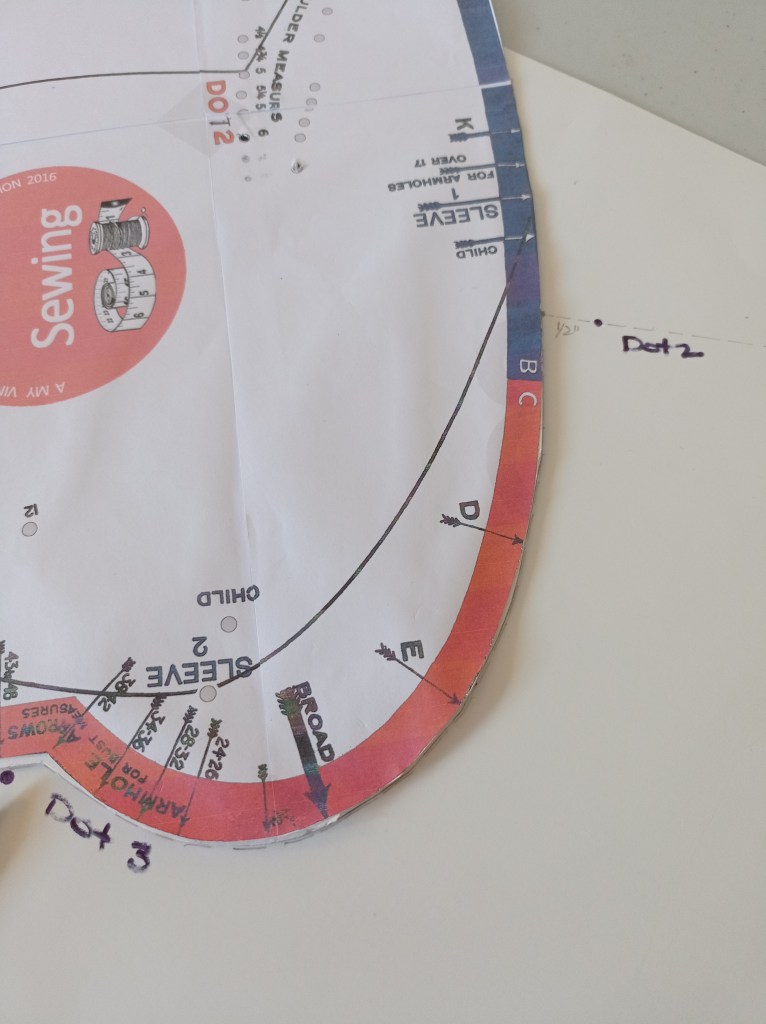
Dot 1 (neck measurement) Arrow B or C (see note on bust measurements) Dot A arrow Dot 2 (shoulder measurement) Dot 3 (bust measurement)
Make sure to note, which dot is which. Knowing where they are, will be important and help you out when you make the pattern pieces! Once you have created the above dots, you will now be moving the template around to make the rest of the lines and curves.
Neck measurement(Dot 1)
Arrow B (edge of chart. For Bust measurement up to 42″ – for bust measurements over 43″ make a dot at C arrow)
Dot A arrow
Shoulder measurement (Dot 2)
Bust measurement (Dot 3)
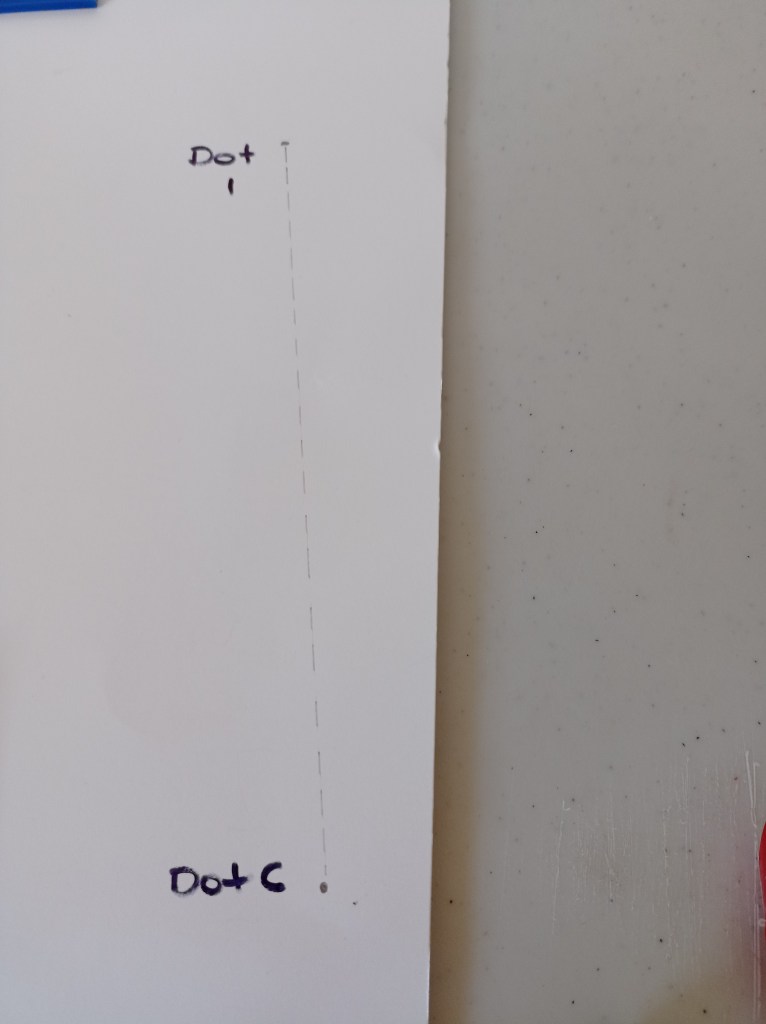
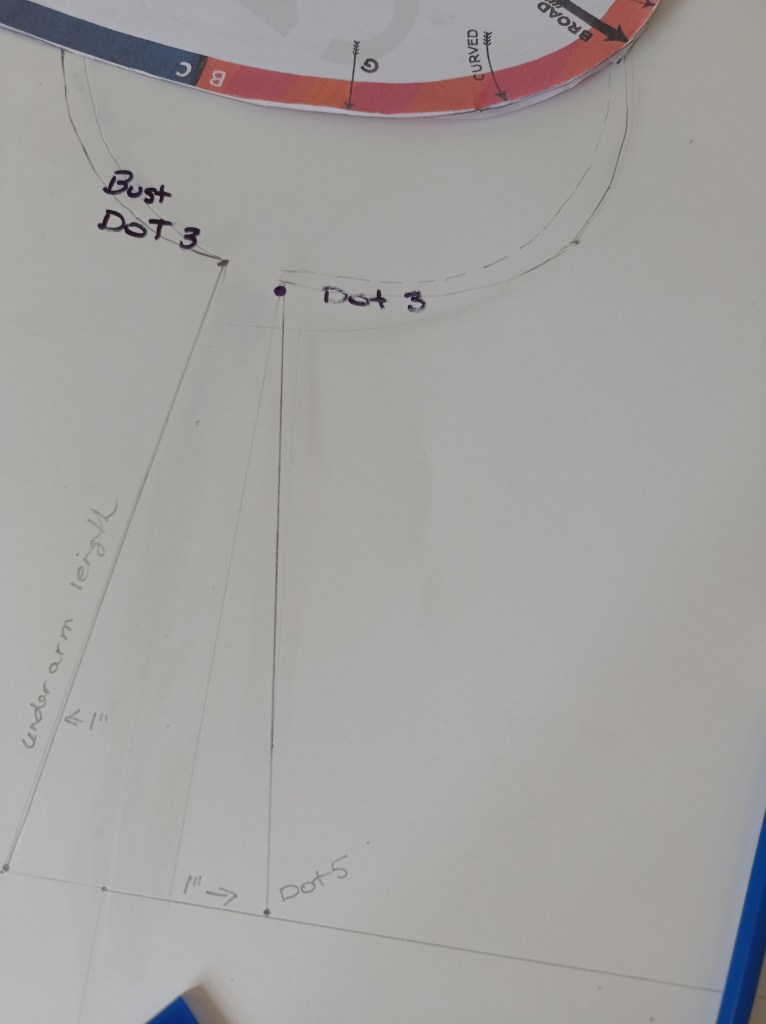
Draw a dotted line from Dot 1 to Dot B (or C – if Dot C the line must be continued for 1 1/2″ longer). Then draw a straight line to the required length. This is the Front Centre Line.
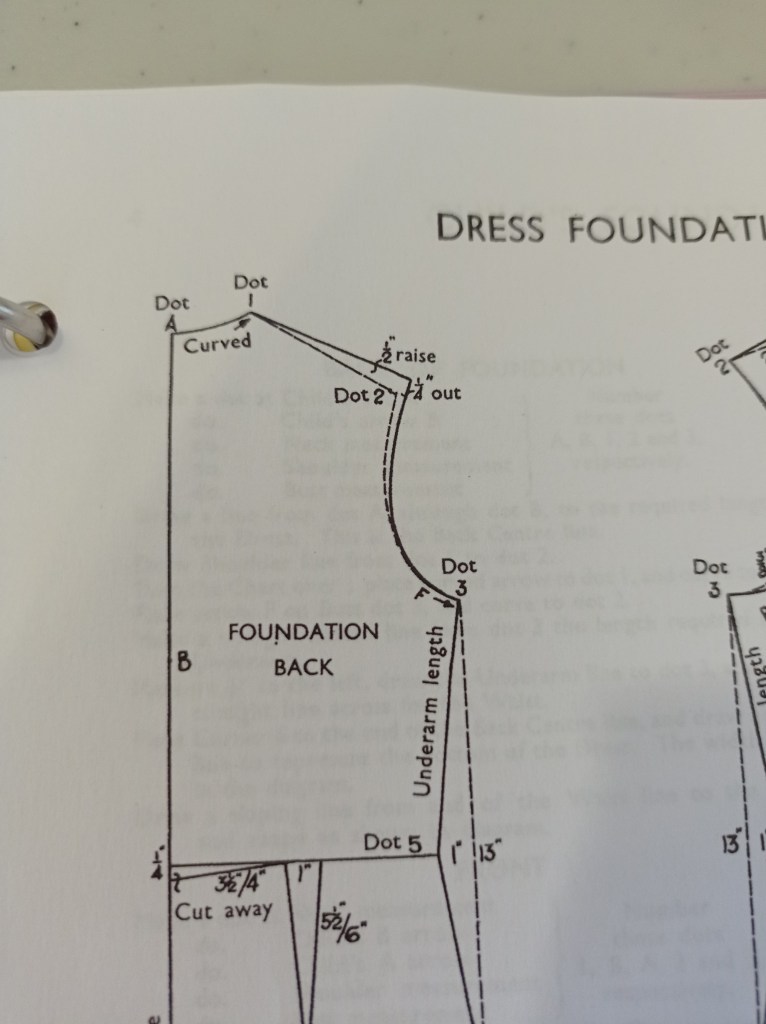
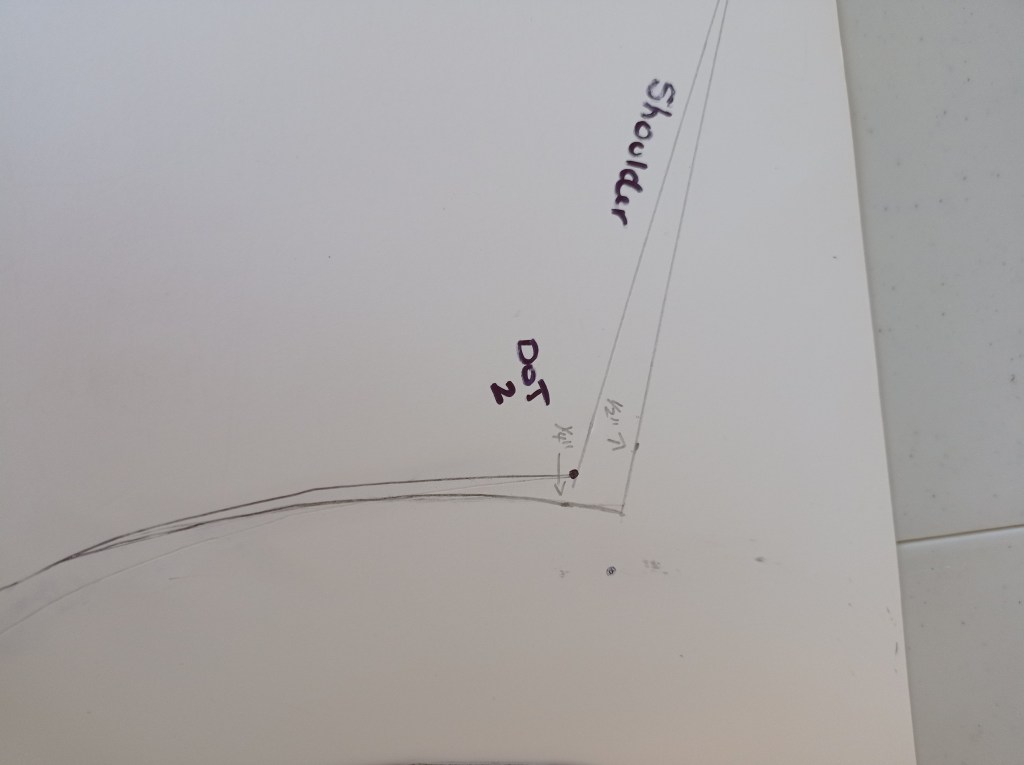
Draw a dotted Shoulder line from Dot A to Dot 2. (bust 40″+ make a dot 1/2″ to the left of Dot 2 to allow for Dart (as shown in Diagram (Foundation Draftings with Instructions)))
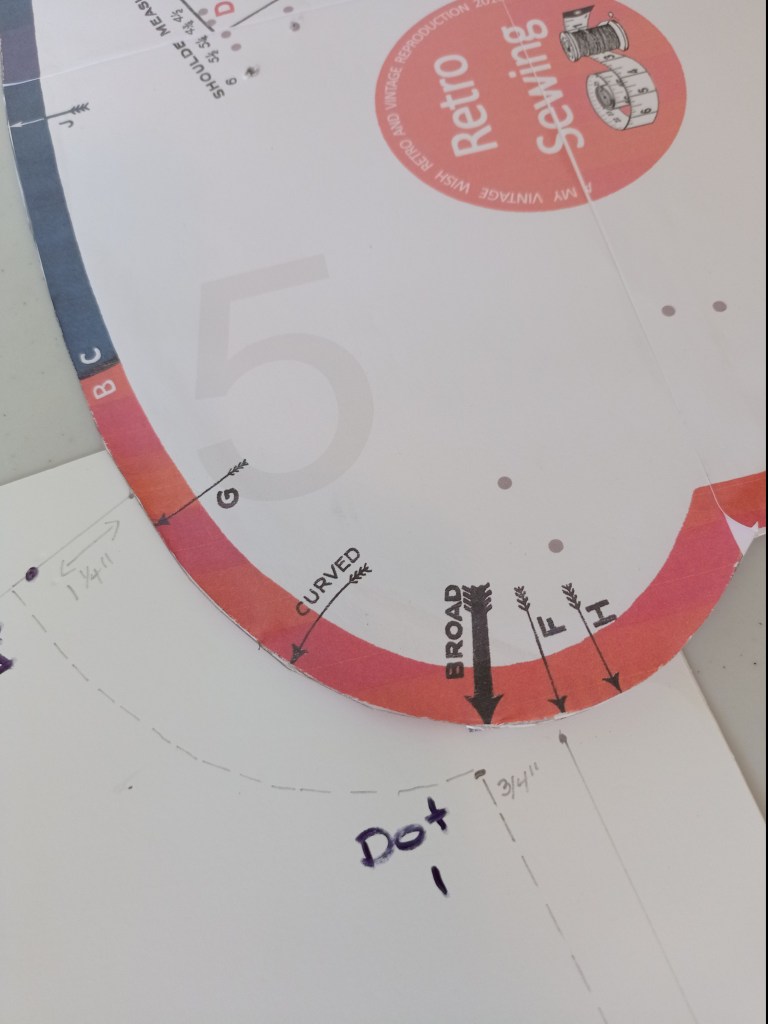
Draw Neck Curve. Place arrow F on Dot 1 and make a dotted line round the curve to A.
Draw Armhole Curve.
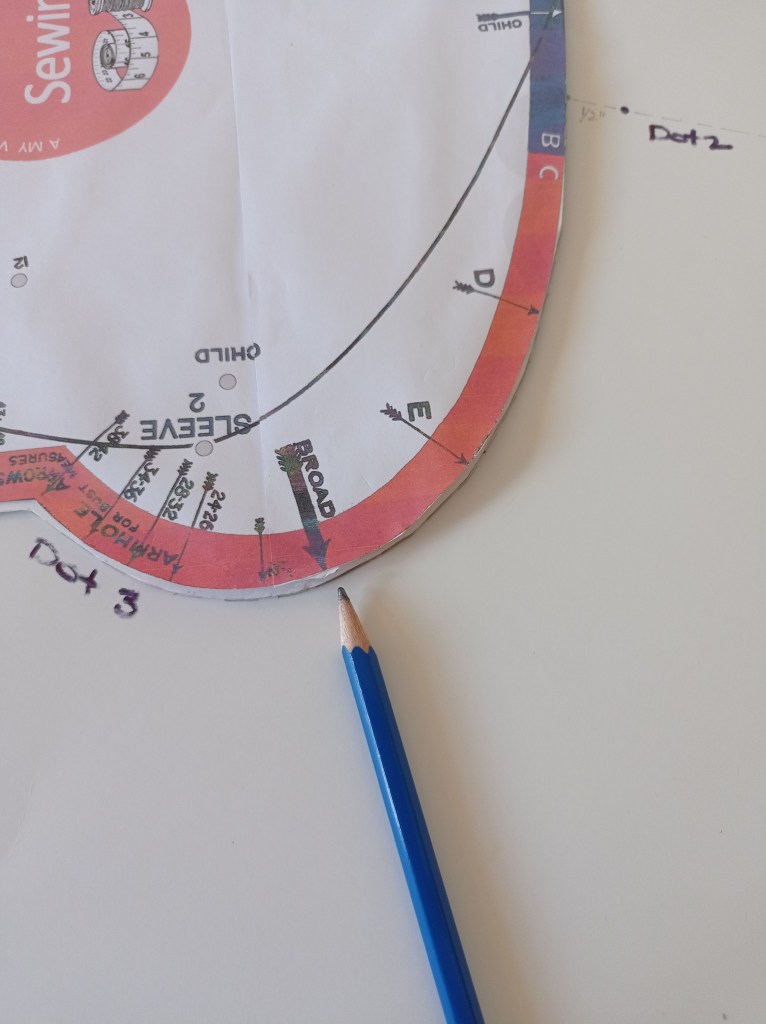
(Bust 24″-42″) turn the Chart over to the back with the long straight edge to your left, and place it to Dot 3, the Armhole arrow corresponding to the bust measurement required. Draw a line from Dot 3 to Dot 2.
(Bust 43″+) place 43″ to 48″ arrow to Dot 3, the Blue Curve touching Dot 2. Draw curve from Dot 2 to Broad Arrow, then turn chart over to the front side and place Broad Arrow to the end of the line already drawn. Complete drawing the curve to Dot 3.
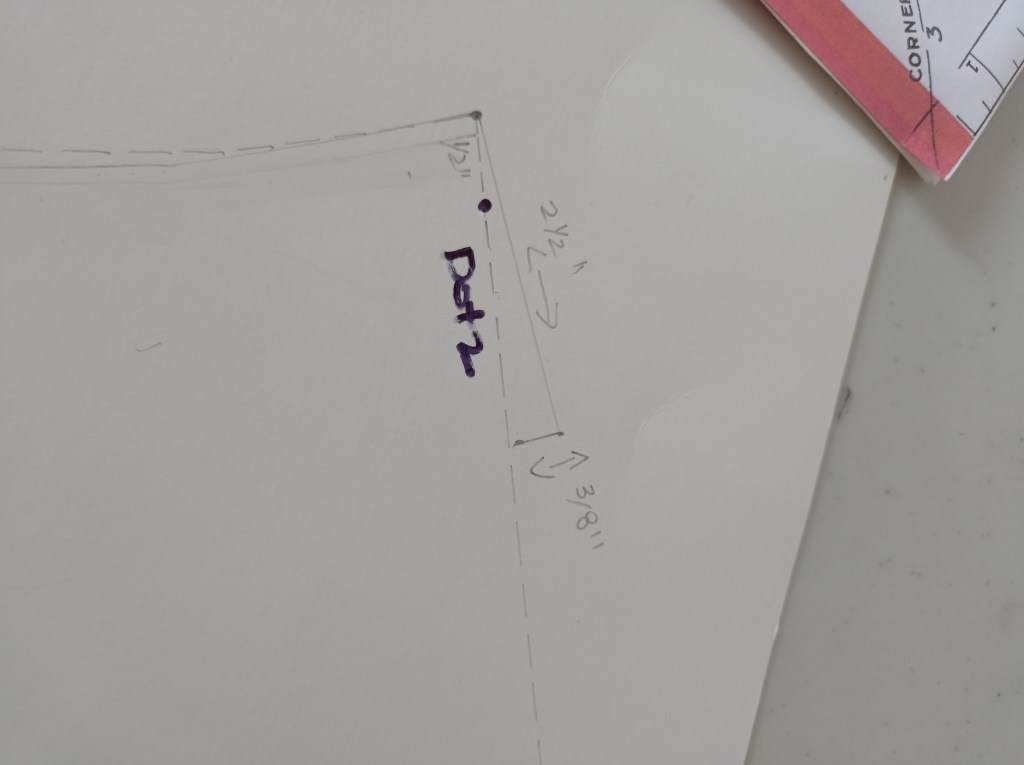
Don’t move the ruler/guide! For all sizes measure 3/8″ in front of Broad Arrow and make a dot. Place Broad Arrow to this dot and draw curve to end at shoulder line. Then turn the Chart over, place Broad Arrow to the end of line already made and curve to Dot 3. This is now your Armhole Curve.
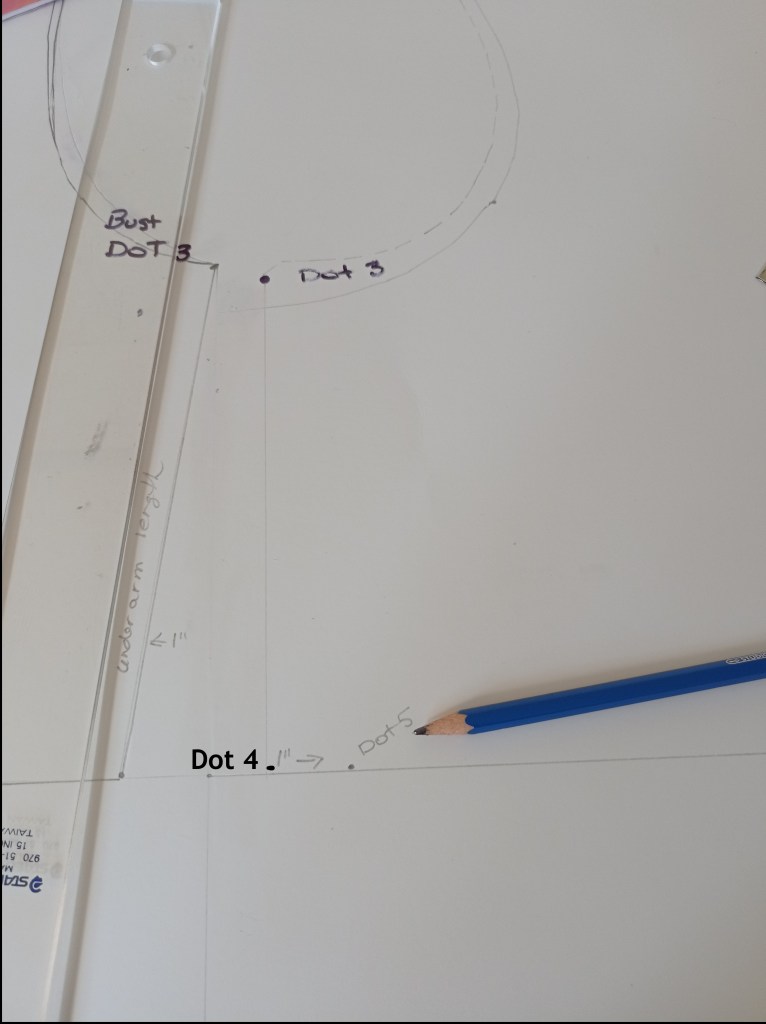
Draw the Underarm. Draw a dotted line from Dot 3 to Dot 4 (the original dot, to the left of Dot 5). Then measure inwards 1″ and mark as Dot 5. Draw a straight line from Dot 3 to Dot 5. Continue the underarm to the required length.
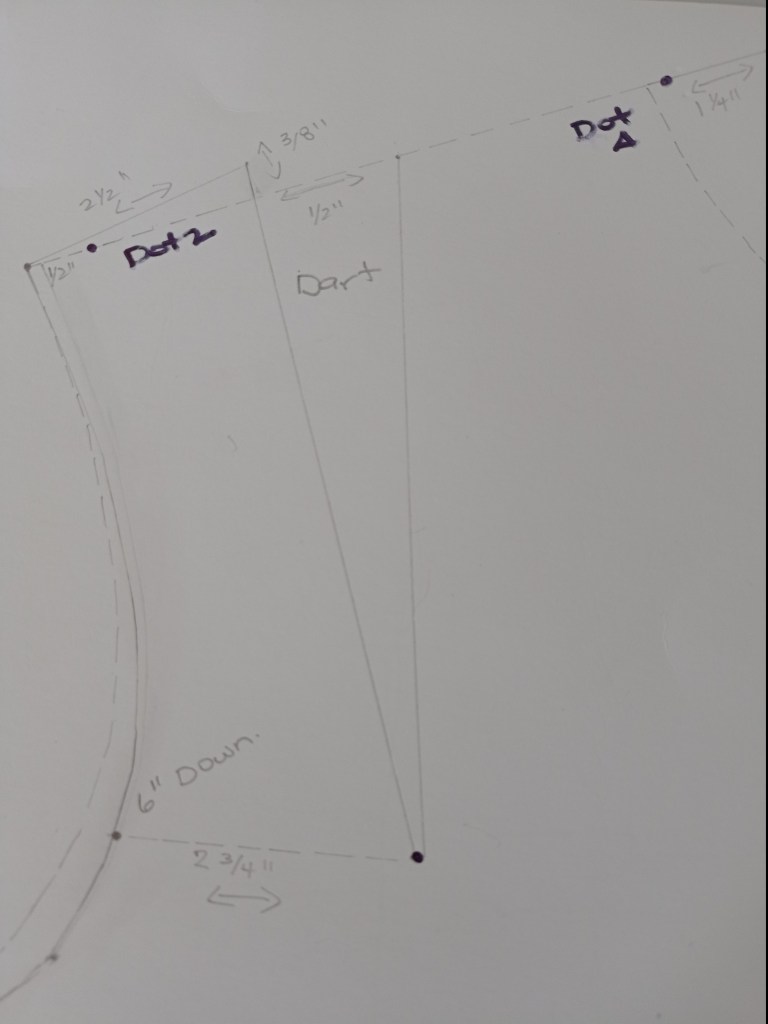
Shoulder dart, follow the measurements on the Diagram. (Foundation Draftings with Instructions). Do the same for the final neck measurement.
Now you have your back and front bodice slopers!
In Part 2c, we will use the bodice sloper to create a dress bodice pattern pieces!
Welcome to Part 2 of our adventure. If you have read Part 1, you will have your tools assembled and ready to go. If you haven’t read it, please go ahead and do that before reading the rest of this post. There are several tools that you will need in order to make your sloper.
Ok? Ready? Yeah! Let’s get to making that sloper!
Taking Measurements
As mentioned in Part 1, you will need the Foundations of Drafting with Instructions document in order to create you sloper. The sloper is required to make the garments in the Haslam catalogues. Trust me, once you have your sloper made, you will be off to the races! The catalogue/magazine for Haslam are chock full of amazing garments to make!
The first thing you will need to do, before creating a sloper is take your measurements. There are clear and concise instructions on what measurements you will need and how to take and calculate them. It is very important that you take all of the measurements.
The beauty of a pdf is if your measurements change over time or you want to create a sloper for someone else, all you need to do is print off the measurement page again.
Once you have completed calculating your measurements, you are ready to make your sloper.
{you will need someone to help you take the shoulder measurements}
Making Your Sloper
For this post, I am going to show you how to create a sloper bodice back piece only. In Part 2a, I will show you how to make the sloper bodice front piece. I thought that it would be less overwhelming to break the creation of the sloper into two pieces. There are quite a few steps and I know for myself personally, when I am learning something, if I digest it in small pieces, I am less likely to get frustrated.
*The reason I’m creating a bodice sloper rather than a full dress sloper, is I tend to make a lot of gathered skirt dresses. Personally, I find it easier to work with just a bodice piece in those circumstance. That said, I will be creating a full dress sloper in a future YouTube video! (you can subscribe here for future content) If you want to continue on and complete the full dress sloper, go for it!*
Tip 1: You will need to punch holes on the ruler/template for your measurements. Tip 2: I strongly suggest using a sharp/pointed pencil and a softer lead for drawing your lines. Tip 3: Use poster board/bristol board to create your sloper. It is a sturdier material and you will be able to use it over and over again. I also pasted my ruler/template to poster board/bristol board. Tip 4: For the creation of the initial dots, you don’t want your ruler to move. You may want to put pattern weights on it.
If you have any questions about the instructions or suggestions, please leave them in the comments below.
The Steps:
Back of Foundation (dress bodice)
Place the Chart on the paper with the long straight edge toward you, and the left-hand edge on the edge of the paper.
For these dots, you won’t be moving the template around, please try your best to keep it in the same spot. In the images, I have the pencil pointing at the dot you should be making.
Now make the following dots (steps below in photos):
Dot A Dot B Dot 1 (neck measurement) Dot 2 (shoulder measurement) Dot 3 (bust measurement)
Make sure to note, which dot is which. Knowing where they are, will be important and help you out when you make the pattern pieces! Once you have created the above dots, you will now be moving the template around to make the rest of the lines and curves.
Dot A
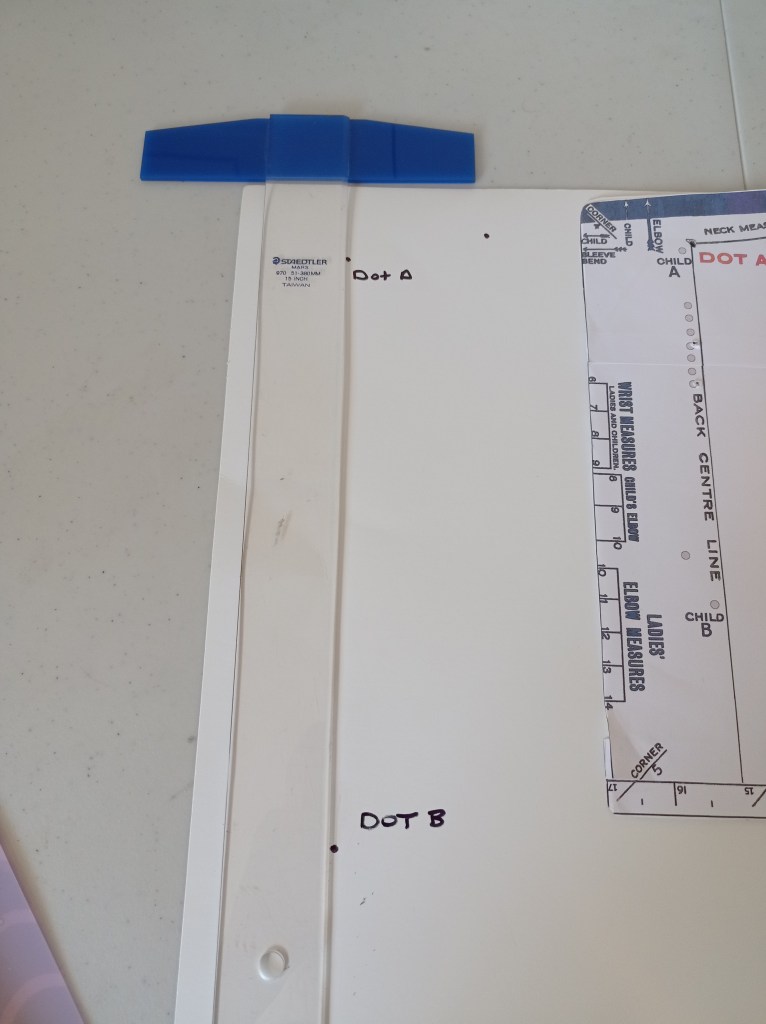
Dot B
Neck measurement (Dot 1)
Shoulder measurement (Dot 2)
Bust Measurement (Dot 3)
Now that you have made your initial dots, you are going to start drawing some lines and curves using your template.
Draw a straight line from Dot A to Dot B (this is your Back Centre Line)
Draw the Shoulder line from Dot 1 to Dot 2.
Draw the neck curve. To do this turn the chart over to the front side and place the Curved arrow on Dot 1 and draw to Dot A.
Draw the armhole curve. Place arrow F on the Dot 3 (Bust), with the blue curve of the Chart on your left and draw to Dot 2. (If your bust is 40″+ use Arrow H on Dot 3 and draw to Dot 2)
Place arrow F on the Dot 3 (Bust), with the blue curve of the Chart on your left and draw to Dot 2
(If your bust is 40″+ use Arrow H on Dot 3 and draw to Dot 2)
Mark the 1/2″ Shoulder raise and 1/4″ extension at Dot 2 and draw the lines as show in the diagram (Foundation Draftings with Instructions).
At this point (since we now have an armhole), I measure from the bottom of the armhole to my natural waist. (in my case 7″). I then draw a dotted line down. Using this, I continue the line for the Back Centre Line (vertically) to match. I then draw a line horizontally to connect them.If you are doing a full dress sloper, you don’t do this.
Draw the underarm. Draw a dotted line from Dot 3 to Dot 4. Then mark the length. Now measure 1″ inwards and make Dot 5. Draw a straight line from Dot 3 to Dot 5.
I measure from the bottom of the armhole to my natural waist. (in my case 7″). I then draw a dotted line down.
Then draw a line from Dot 5 to the Centre Back line. (This is where your natural waist will be.)
You have now drawn your back bodice sloper! As mentioned above, I will show you in Part 2a, how to make the front sloper.
Please let me know if this was helpful, or if you have questions!
For as long as I can remember, I’ve been interested in draft-at-home systems and mostly intrigued with the Haslam System of Dresscutting. Each and every time I go into a vintage store or thrift shop, I’m always on the outlook for books.
A few years ago, I bought the ruler, foundation document and a booklet with patterns, with the plan to try to figure out how the Haslam system works. After reading through the documentation, I knew I was going to need to see a tutorial of some sort to figure out how it all worked… yet, I couldn’t find any. Recently, I have found a couple YouTube channels and a blog that has made efforts to explain how to use the system, but I feel that there is still information missing and this is why I’ve decided to create a four part series.
The four part series will include steps to use the system, resources and the sewing project I’ve chosen. Hopefully, it will help those also interested. If there is anything you think is missing from the series, please let me know.
Over the next four weeks, I will be posting one series part each week. This is the first one!
Once I am done this blog series, I will do an additional post for a blouse sew-a-long we will be hosting in our Discord Community.
Enjoy!
What is Haslam System of Dresscutting
The Haslam System of Dresscutting is a draft-at-home system, that allows you to create your own sewing patterns using you own body measurements. You can also use the pattern to create different sizes as well as tailor the pattern to fit your body type. This is achieved by creating a sloper and pattern pieces. The system was devised by Miss Grace Haslam and was an original home business that eventually has Miss Haslam travelling all over the country teaching her method of dressmaking.
Paper for drafting – I recommend you get something a little more sturdy than tissue paper for this. Some sewists like to use a stronger paper like packing paper. It’s what I use when I draft my own patterns.
Pencil and eraser
Paper scissors
Glue and bristol board (if you want to make a sturdy, reusable template/ruler
In part 2 we will talk about how to draft your sloper and pattern pieces using the tools I’ve talked about above. If you aren’t already, please follow me on Instagram as I will be providing mini updates there as well.
I’ve been slightly obsessed with the Draft at Home Systems that were popular between the 1920s to the late 1950s. As someone who self-drafts or has to resize vintage patterns, I fully appreciate the adventure of using these systems. I mentioned in a recent post that it is time for me to level up my sewing skills and I personally think that this is the way to to do it, not to mention, I can continue to customize patterns and garments to fit my body.
What are Draft at Home Systems you ask? These were generally patterns or pattern books sent via mail order or found in magazines. Many of the books would include a variety of patterns including women, men, children and occasionally household patterns. The systems would also assume that an experienced home seamstresses would be using the patterns. In most cases patterns would not include facings, pockets or even instructions. It was up to you to figure that all out. The patterns themselves would be considered easy enough for the sewist to draft themselves, as sewing was a skill that would be taught from generation to generation. In my opinion, it should still be a learned skill that everyone should know — but, I digress, that is for another post.
There are several different types of Draft at Home Systems, I am listing several below and if you are interested in trying them out yourself, I will include links for as many as I can. The first ones listed are the ones I will be trying soon. I will be posting about my adventures in using these systems and I hope you come along for the journey! As I find more drafting systems I will be sure to blog about them.
Haslam System Of Dress Cutting The Haslam System was very popular from the 1930s all the way to the 1950s, which is quite a feat as many other drafting systems would generally be popular for a particular period and fall out of popularity when a newer, better system was created. I plan on making the green dress that is in the illustration below. I’ve wanted to make more 1930s fashions, but the sizing generally doesn’t fit me. With the actual Draft at Home System I can customize the pattern and garment to fit my measurements!
Mrs. Depew Many of Mrs. Depew’s patterns are from a French pattern drafting system fairly similar to the Lutterloh golden rule patterns. Thought the site doesn’t say which I am taking a wild guess that it is Eclair Coupe Paris. Though Mrs. Depew isn’t an actual drafting system, I am including it here as there are a lot of Draft at Home System patterns on her website. I feel like her website is also a great resource.
Sewists will be able to draft patterns to their exact sizes from the miniature pattern template and specially designed rulers. If you need help with drafting your pattern, Mrs. Depew has a really handy blog post about it.
Enid Gilchrist Enid Gilchrist was an Australian fashion designer, who became well known for her numerous self-drafting sewing pattern books which were very popular in the 1950s to 1970s. The pattern book I have has a great selection of dresses and I can’t wait to make one of the day dresses! If you want to purchase a book Subversive Femme over on Etsy has two.
In addition to these three systems I have a few more I want to try out. I have listed those below with other drafting systems that are out there! These are just a few, there are so many more systems. The ones I am interested in are from 1900 to the early 1960s. I am always on the hunt and my goal is to try to make at least one garment from as many of the systems as I can.
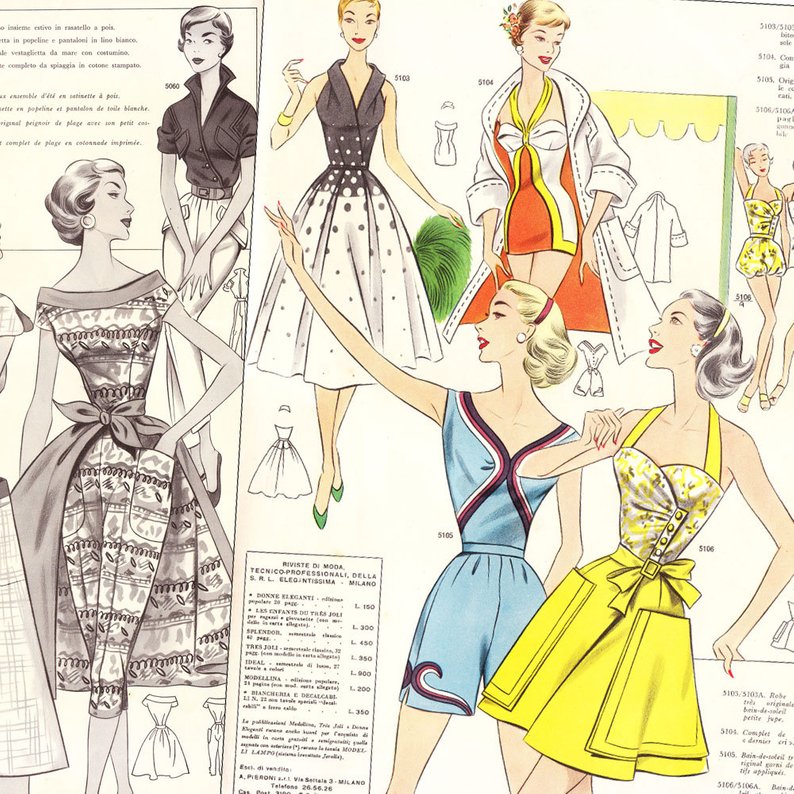
Italian Drafting System Elegantissma was an Italian drafting system that was popular in the mid to late 1950s. If you want to buy one of the magazines, you can find them here.
“Making fashionable, professional looking clothing, requires complete control over fabric, style and fit.
Choosing and making your own patterns, is the ideal way to create your individual style and achieve consistently proper fitting garments. The Lutterloh pattern making system is the perfect solution for today’s busy sewer.
Fashion conscious sewers from around the world have been using the Lutterloh method for decades, beginners and professionals alike. This system is quick and easy to learn.
Astonishingly simple, you need only two measurements to make an excellent fitting pattern every time.“ www.lutterloh-system.com
Eclair Coupe Paris This system was developed in the late 20s. I’ve compared it to the other pattern systems I have and I am finding this one quite easy to follow. I like that you get handy paper rulers that go up to very large sizes. I have also found instructions on how to make my own rulers if need be.
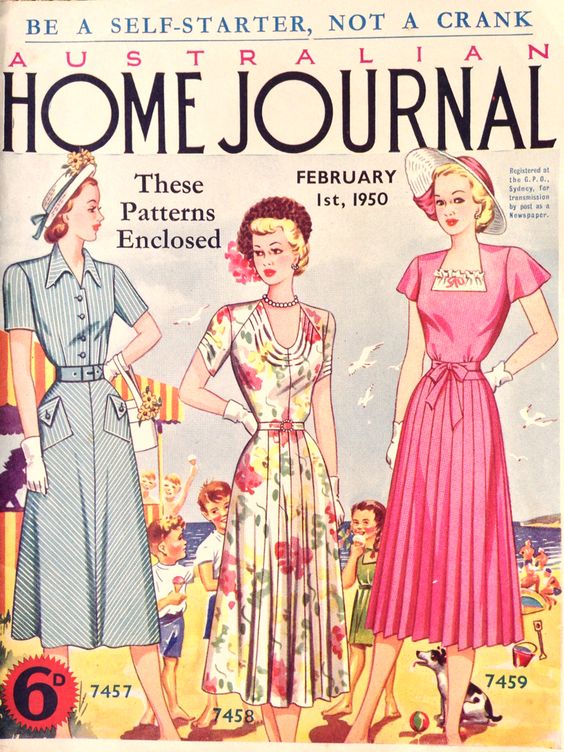
Magazines A large variety of women’s magazines would contain either knitting, crochet or sewing patterns. I’ve listed a few below.
Australian Home Journal Good Needlework Home Chat Ladies Companion Ladies Home Journal My Home Stitchcraft Weldon’s Ladies Journal (Here is a link to a pdf of a magazine ) Women at Home Women’s Life Women’s Weekly Women’s World